
Practical PowerShell Part 2: Perfection not needed - finding cmdlets, interpreting errors, and returning an object
This is the second part in my series on Practical Powershell for the IT Pro looking to get started with PowerShell. You can find the first post here.
Welcome back! You have found the second post in my series on Practical PowerShell, perhaps this series would be more aptly titled, “How to stop worrying and love the script.” This is a series that is dedicated to the IT pro that wants to learn PowerShell but doesn’t really know where to start. There are more comprehensive resources available, but this is meant to be a logical introduction on PowerShell. The first post was meant to be a basic introduction. The rest of the series will follow a common theme. Each post builds on the lessons taught in the one before it. We are going to start with a basic concept that can be accomplished in a few cmdlets, and eventually build a utility that started with these first few steps.
The most important lesson in learning PowerShell is simple: No one expects you to know everything.
Let that sink in. You don’t have to be perfect. In fact, most of us who use PowerShell regularly learned through trial and error (mostly error). The most important tool in a proficient PowerShell toolkit is a search engine. It helps you find cmdlets, troubleshoot errors, and find scripts other IT Pros have created that we can use as is or repurpose to fit our needs. This series would be really short if I just presented a challenge and used Bing to find a pre-canned script that solved all of our problems. It may be the right answer for a lot of the issues we run into daily, but it doesn’t help us to build a bigger toolbox. My goal is to point you in the right direction to begin writing your own scripts, build basic utilities, and become more confident in your own abilities. This is a modern endpoint management blog, so I want to make sure we build skills that are relevant in a cloud-first endpoint management world. Through this blog series we will build a utility to help use manage users, devices, and licenses in Azure AD through PowerShell.
Let’s get to it
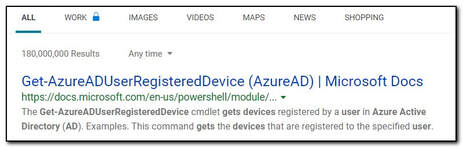
The first step in building any PowerShell script is defining what we want our script to do. Once you have an end goal in mind you can begin building pseudocode (an outline of your code written in plain language), and from that you can begin building the code needed to build your script. I plan on covering pseudocode in a future post. In this post I want to focus on a single task. The utility I am going to build through this blog series will focus on user, device, and license management in Intune and Azure, so we are going to start at the beginning. I want to return my Azure AD user object in PowerShell. Whether you’ve worked with PowerShell for years or you’re just getting started, the first step is to identify the cmdlet you need to accomplish that task. We’re going to begin by going to Bing and searching for “get azure ad user object PowerShell.” That should give us relevant results:

The first result that appears is from https://docs.microsoft.com/. It is the Microsoft support site for the Get-AzureADUser site. If you find a cmdlet that matches what you’re trying to accomplish, this is always a great place to start!
When you visit the Microsoft support page for a cmdlet there’s a lot of very useful information available. In this case we can see that Get-AzureADUser is part of the AzureAD module (spoiler alert: this is going to be important later). In the left-hand column, we can see the module version and other cmdlets available in this module. The main window describes what the cmdlet does, “Gets a user,” includes code blocks to show the proper syntax, and further down the page includes several examples on how to use the cmdlet.
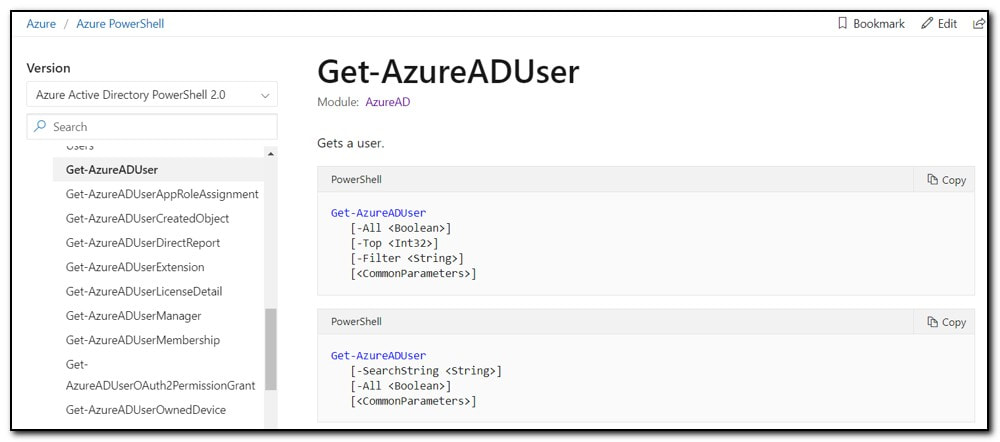
If we look at the available examples, we see that we can search for a user using their User Principal Name by using the -ObjectID switch.

So, what happens if I try to get my Azure AD User object in PowerShell?
Get-AzureADUser -ObjectID "sean@modernendpoint.com"
This looks like a learning opportunity! That’s a lot of red text! You will learn quickly what an error message in PowerShell looks like. Don’t worry – we all see a lot of red text in PowerShell! This is how you know you’re learning! Fortunately, most of the error messages in PowerShell are descriptive, at least descriptive enough to help you find a solution.

The first line of this error message tells us everything we need to know, “Get-AzureADUser : The term ‘Get-AzureADUser’ is not recognized as the name of a cmdlet, function, script file, or operable program.”
I know what you’re thinking, “I thought you told us the error messages would be useful? This just tells me that the cmdlet I’m trying to use isn’t available. How do I use something that’s not available?”
If you aren’t familiar with an error message, simply copy and paste it into your favorite search engine. You already know what Bing looks like, so I will skip ahead. The results will tell you that we need to install the AzureAD module (I told you it would be important later). If you know the name of a published PowerShell module, it is easy to install. First you need to open PowerShell as an administrator (right click and select ‘run as administrator’). In the console type “Install-Module AzureAD”. This will reach out to PSGallery, the default public repository to check for a module named AzureAD. Most public modules are available here, and installing them is as simple as entering the cmdlet.
Install-Module AzureAD
You will be prompted to trust the repository. Click “Yes” to continue.

Once the module has installed, we can attempt to run the Get-AzureADUser cmdlet again.
Get-AzureADUser -ObjectID "sean@modernendpoint.com"
This creates another learning opportunity! The cmdlet failed with an error, but this time the text has changed. This is much clearer, and even offers a resolution, “You must call the Connect-AzureAD cmdlet before calling any other cmdlets.”

This error message explains our next steps well. We can connect to AzureAD by using the Connect-AzureAD cmdlet.
Connect-AzureAD
This will open the Microsoft 365 sign in screen. Sign in with an account that has permission to administer Azure AD users.

Once you have connected, PowerShell will return information about your connection.

Let’s try to get my Azure AD user object again. This time the cmdlet completes without error.

We can pipe the Get-AzureADUser cmdlet into the Get-Member cmdlet. This will return all the available members of the Azure AD user object.
Get-AzureADUser | Get-Member
The Azure AD User object includes Methods and Properties. Methods can be defined as actions you can perform on an object. Properties are attributes of an object that you can work with.
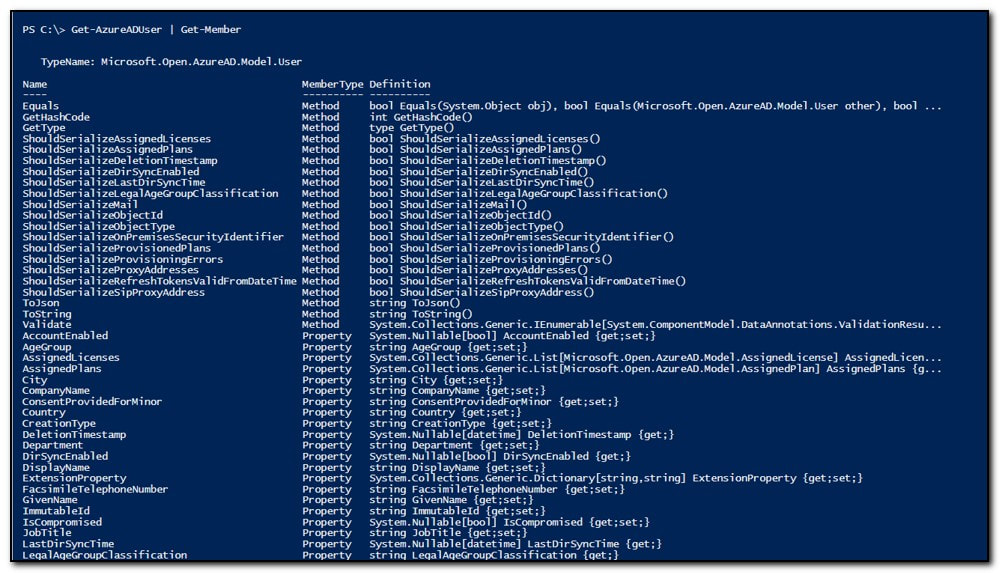
The AzureAD user object has a long list of available properties. If we want to view some of the properties on a user, we can pipe the Get-AzureADUser cmdlet into Select-Object. Select-Object can also be accessed using the alias Select. For example, if we want to view the DisplayName, ObjectType, Mail, PreferredLanguage, and UsageLocation for my user object we could use the following cmdlet:
Get-AzureADUser -ObjectID sean@modernendpoint.com | Select DisplayName, ObjectType, Mail, PreferredLanguage, UsageLocation

We can also assign the output to a variable. We set a variable using the format $Variable = “value”. To return the result of a cmdlet to a variable we simply use the following format:
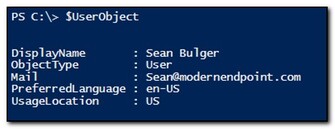
$UserObject = Get-AzureADUser -ObjectID sean@modernendpoint.com | Select DisplayName, ObjectType, Mail, PreferredLanguage, UsageLocation
When we set the output of a cmdlet to a variable nothing is returned in the console window. Once the cmdlet completes we are returned to the PowerShell prompt.

You can view the object by calling the variable on its own.
If you only want to see the value of a specific property (or work with it in a script) you can return a single property by typing $variable.property at the prompt. Later in this series you will see how this makes it easier to work with an object and its properties than trying to handle them all separately.

In this post we explored the idea that you don’t need to know everything to use PowerShell. Most of us start any new scripting project with a search engine to find what tools are already available. We explored how to interpret error messages, and finally how to return an Azure AD User object and work with that object to view specific properties. We also passed the user object into a variable. My goal was to build on the basics I set out in my last post. Through the rest of this series I will continue to build on the lessons taught in the previous post. In the next post I will show you how to string multiple cmdlets together to build a basic script. We will build a script that connects to Azure AD, returns a user object, and then uses that object to find a user’s Azure AD registered devices.