
MMS Intune Management PowerApp Demo Part 2: Creating the PowerApp user lookup controls
Hello again! It feels like it was just yesterday when I last posted a new blog post. Wait. It was.
If you’ve been following along, you know that I have been writing a series on automating endpoint management tasks with Microsoft Graph and the Configuration Manager AdminService. After MMS I shared a demo app that Doug Wilson (@manageDoug) and I built during our session on building tools with Power Apps and Power Automate. In my last post I shared step by step instructions on building the underlying Power Automate flows used in that app. In today’s post I will start walking through how to build the app itself.
This is a relatively simple app, but I will try to capture any of the details you may need to build your own copy. This app is designed to be a jumping off point for you to explore and understand the art of the possible. Use this tutorial to learn how to work Power Apps, and then use the app you build as a platform to build your own Intune device management mobile app.
Enough chatter, let’s build something…
I have already introduced this app about fourteen different ways, and while I’m not known for brevity – let’s jump right in.
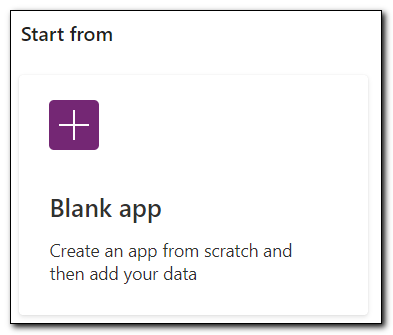
In your browser, go to Power Apps. Click Start from Blank App.
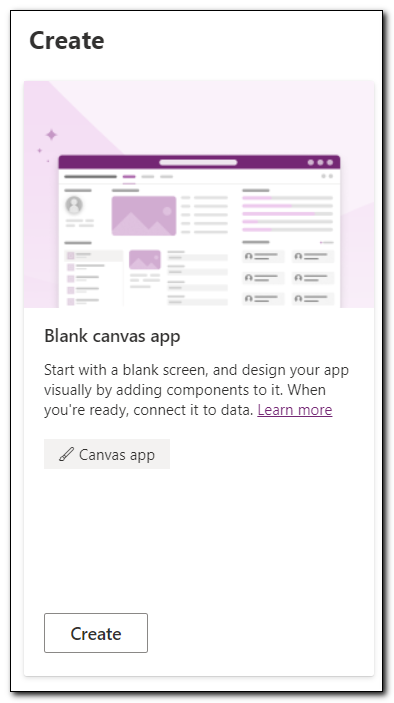
Click create on the blank canvas app card.
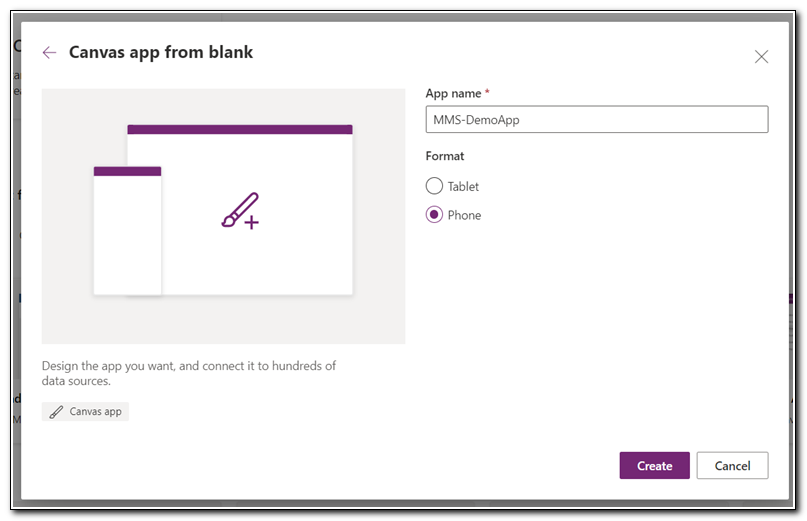
Set the format to phone and name your app. In this example I am naming the app MMS-DemoApp.
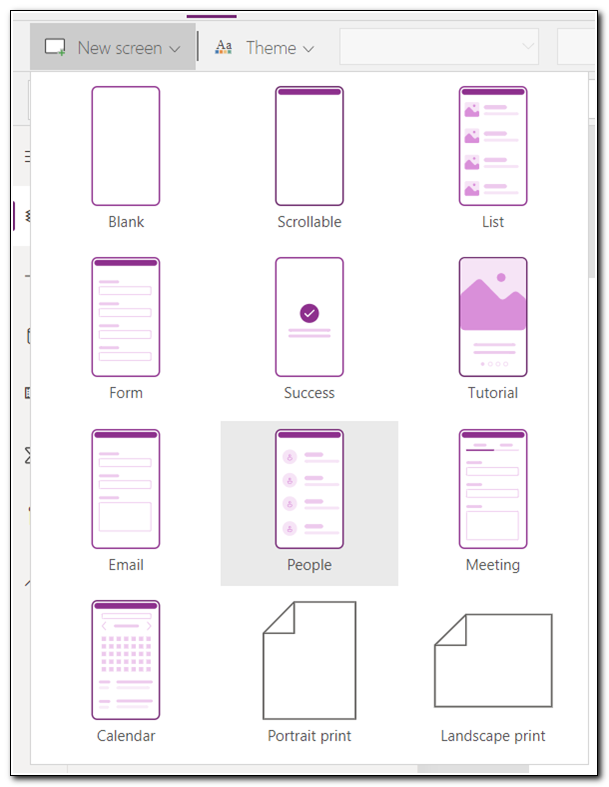
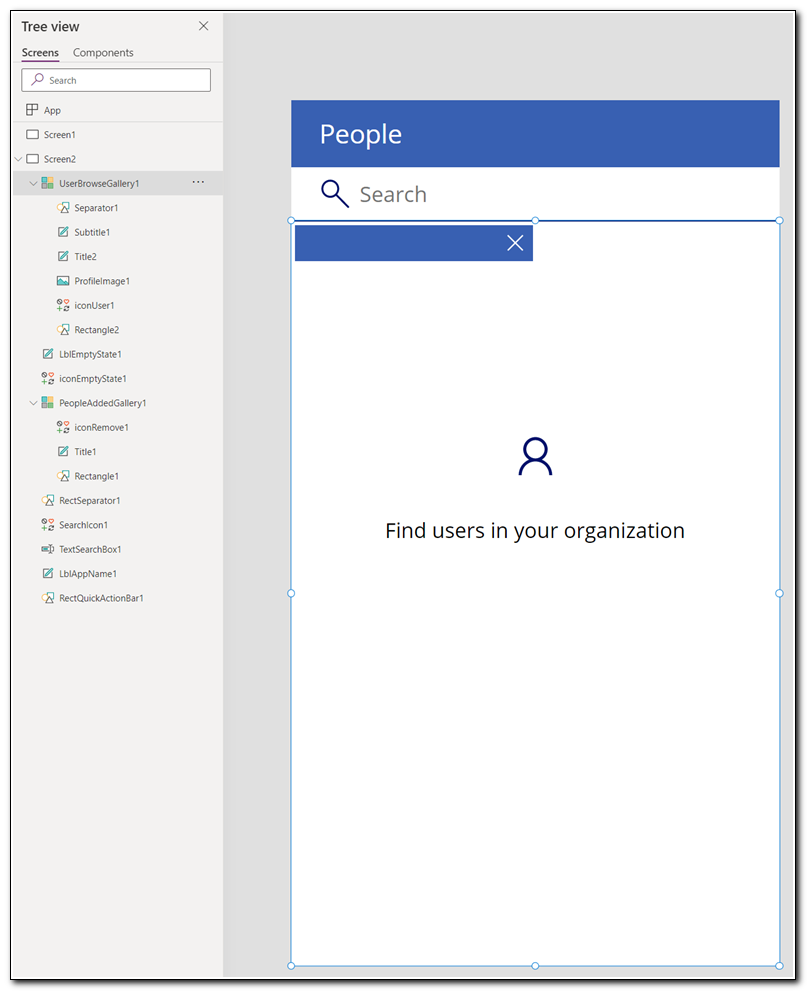
The PowerApp will open to a blank canvas. The first item we will add to the app is a screen with an Office 365 people picker. This will allow us to search for a user and populate a text box with their User Principal Name. There are several screen templates available. We will use a template and edit it to meet our needs. Click “New Screen” and select People.
The default people screen is designed to select multiple users and add them to a list. It also displays a message and icon if no users have been selected. We don’t need those elements in this app, so we will remove those objects from the screen.
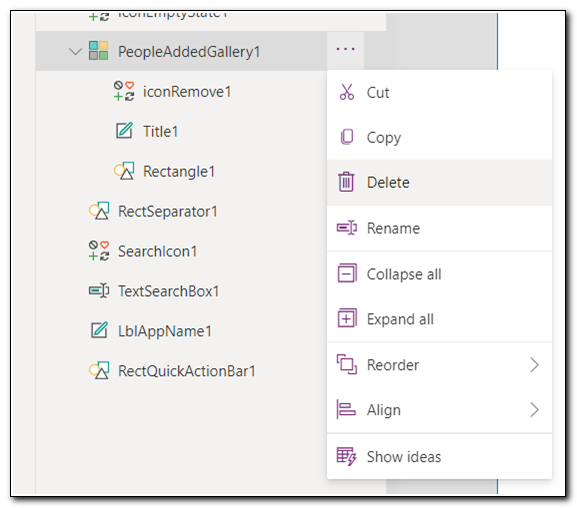
On the left navigation menu click on the ellipses next to PeopleAddedGallery. Click on delete to remove the menu.
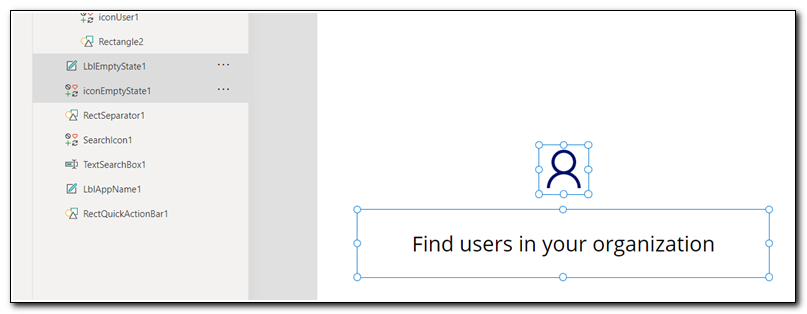
Select the lblEmptyState and IconEmptyState. Delete the objects from the screen.
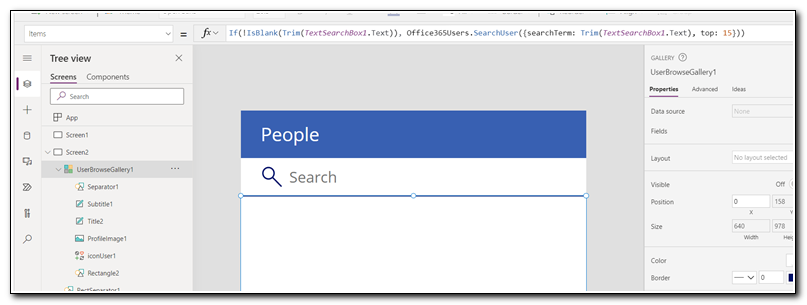
We now have a screen that shows only a search box. There is also a user browse gallery that is not currently visible.
Click on the user browse gallery. To the left of the formula bar, select “Items” from the list of properties. The gallery has a formula in it that uses the Office 365 Users connector. The complete formula is If(!IsBlank(Trim(TextSearchBox1.Text)), Office365Users.SearchUser({searchTerm: Trim(TextSearchBox1.Text), top: 15})).
If we break down the formula, we can see that it is a simple if statement. An if statement is done in Power Apps using a function that follows the format if(condition, do something).
The condition in this statement is !IsBlank(Trim(TextSearchBox1.Text)), which means, “if ‘TextSearchBox1 is blank’ is false.”
If the text box is not empty, it will call the Office 365 Users connector and perform the SearchUser action. It will search for the text in textSearchBox1 and return the top 15 results.
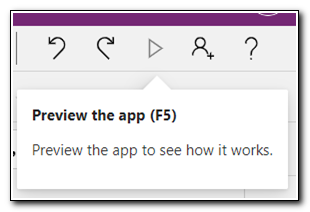
If you want to test the app you are building, you can hit the play button in the upper right corner of the app. This will launch the app in PowerApps and allow you to test the current state.
Search for a user with the app. You should see a list of users appear and be able to select a user. Click the X in the upper right corner to return to the canvas app
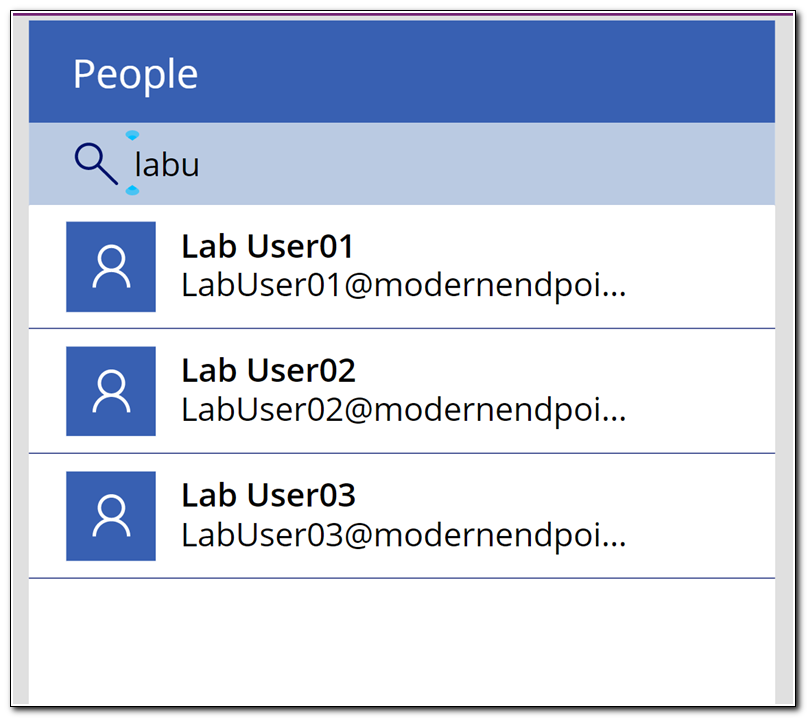
The canvas app will now show the data that was returned from preview mode. We can now see the user browse gallery and the various elements that were returned. The OnSelect property will not show a script in the formula bar. We will add a few more elements to the app, and then edit this script to control what happens when we click on the Title value in the userBrowseGallery.
Click the Text button on the ribbon to add a new text-based element to your app. Select label to add a new label.
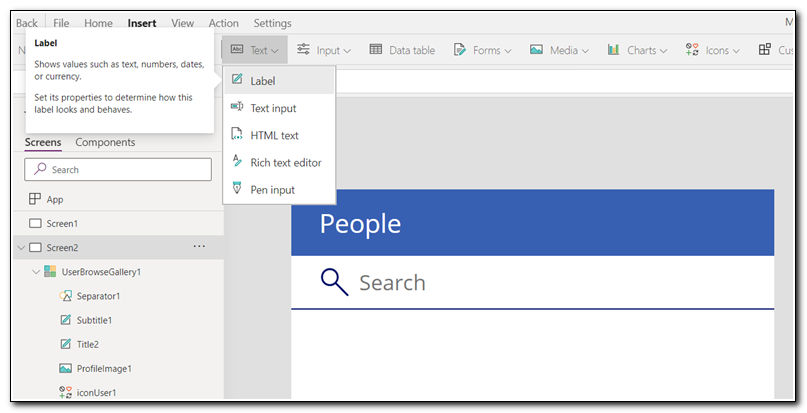
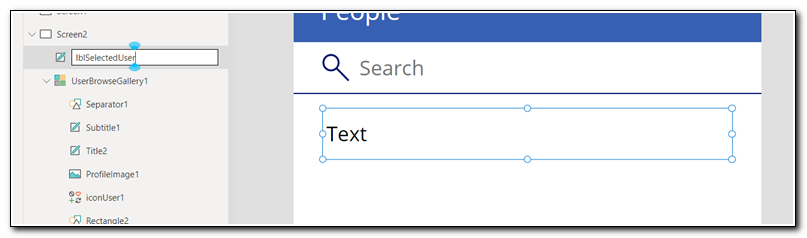
You can rename the element by clicking on the name in the navigation menu on the left side of the screen. This label will be used to label a text box that will show the user returned from the user search function we added above. Rename the label to “lblSelectedUser.”
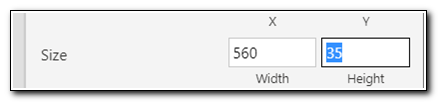
We can change the appearance and function of an element in our app by editing the properties on the right side of the screen. In this case, we want to adjust the side of the label field so it will fit with other elements in our app. Change the Height value on the Size property to 35.
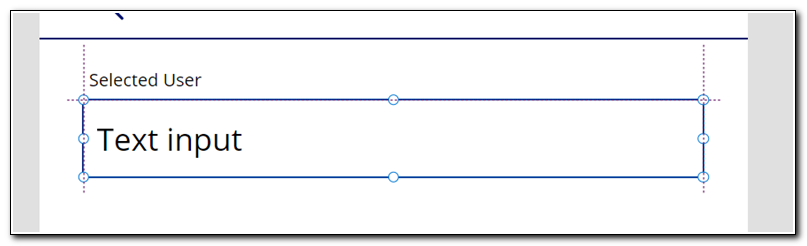
This label will be used as a visual cue for the text box that will display the selected user. Change the text property to “Selected User.” Set the font size to 12.

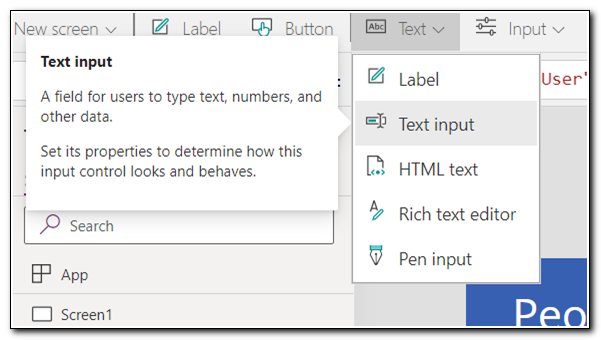
Click the Text button on the ribbon and select Text input. This will add a textbox to our canvas. A text box will allow a user to enter a text value. In our app, a user could manually enter a value, or we can select a user from the userBrowseGallery and have it populate the text box.
Position the text box below the selected user label. Power Apps will snap the text box into position below the label.
Rename the text box to txtUser.
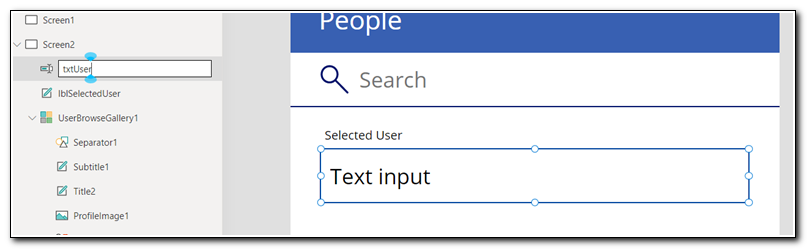
The textbox needs to update when we select a value from the userBrowseGallery. To do this, we will set the default value of this field to a variable that will be updated when we select a user from the search results. Select the Default property of txtUser and set it to _VarSelectedUser.

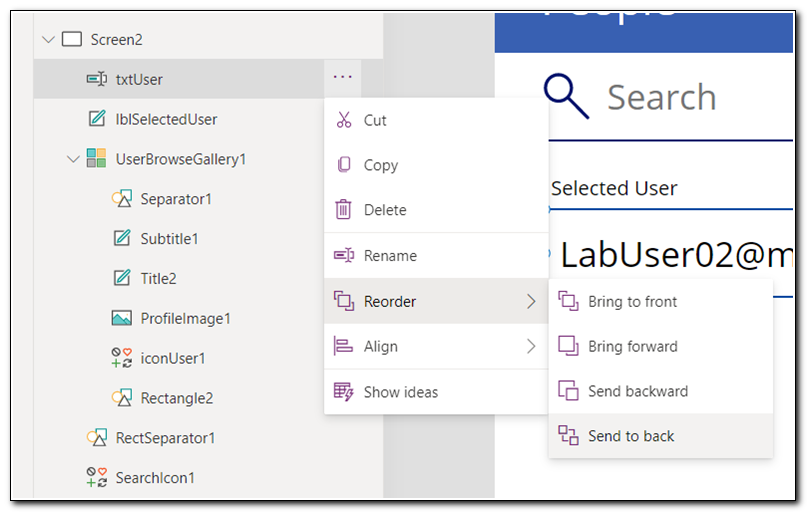
Controls in PowerApps will appear in the order they show up in the tree view. If txtUser appears above userBrowseGallery in the tree view, it will always appear on top of the gallery when the search function is used. To prevent this from happening we can move it behind the gallery by right-clicking on the object on the tree view. Click Reorder and select “Send to back” to make sure it appears behind the gallery.
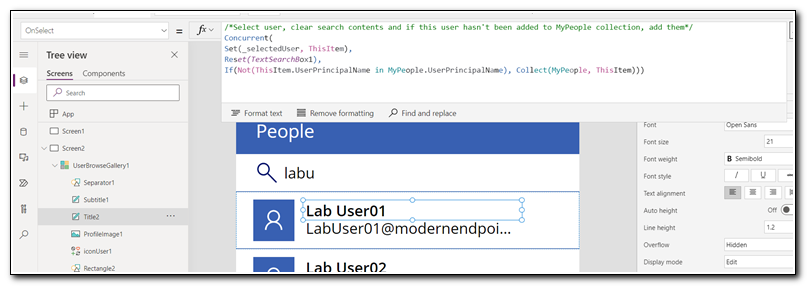
Click on the Title object in userBrowseGallery. Select the OnSelect property to view the script in the formula bar.
We are going to update the OnSelect property by adding an additional action to the script. First, add a semi-colon ; to the end of the last line. Add an additional to the line to the script and enter ` Set(_VarSelectedUser, _selectedUser.UserPrincipalName)`.
All of the actions included in the Concurrent action will be performed concurrently. In this case the variable _selectedUser is being set to the value ThisItem, which is the selected object from the gallery. The value of TestSearchBox1 is being cleared, and finally, the selected item is being added to a collection called MyPeople. (Note: I will explore galleries in more detail in my next post.)
Finally, we are going to set the value of the variable _VarSelectedUser to the user principal name of the user we selected from the search box. We can set variables in PowerApps using the Set function.
The Set function uses the format Set(variable, value). In this instance, we are setting the variable _varSelectedUser to the UserPrincipalName property of the variable _selectedUser.

Test the app by clicking the preview button and searching for a user. After selecting the user, the value of txtUser should be updated to show the correct user principal name.

And now we wait…
To keep this post from getting obnoxiously long, I have broken it down into two separate posts. Keep an eye out here for the exciting conclusion! In my next post I will add two buttons to the app and a gallery object. We will use the two Power Automate flows from my last post to return a user’s devices and retire a device from Intune.
Thank you for reading!
Thank you for reading! I have a lot of fresh content to post soon from MMS. Keep following for more great posts on automating workloads, including some fun PowerApps that I shared with the community!
Follow the full series below:
- Everything I wanted to know about APIs but was afraid to ask
- Connecting to Microsoft Graph with PowerShell
- Troubleshooting Microsoft Graph App Registration Errors
- Defining a script and finding the Microsoft Graph Calls
- Splatting with Invoke-RestMethod in PowerShell
- Updating Device Management name in PowerShell with Microsoft Graph
- Surprise Post:Adding Filters to application assignments with PowerShell and Microsoft Graph
- Working with Azure Key Vault in PowerShell
- Creating an Azure Automation Account
- Setting up a Hybrid Worker on an Azure Arc Enabled Server
- Connecting an Azure Automation Account to the Configuration Manager AdminService
- Running an Azure Automation runbook to update MEMCM Primary User
- Using Power Automate to update MEMCM Device based on Intune User
- Comparing Invoke RestMethod to the PowerShell SDK
- MMS Intune Management PowerApp Demo Part 1: Creating the PowerAutomate flows
- MMS Intune Management PowerApp Demo Part 2: Creating the PowerApp user lookup controls