
Silently Collect AutoPilot Hashes Using Microsoft Graph and a Provisioning Package
Welcome back! Today’s post is a departure from my current series on automating endpoint management tasks with Microsoft Graph and the MEMCM AdminService. If you are looking for that, you can find the entire series here.
Provisioning packs are one of the most underrated tools in OS deployment.
— Sean Bulger (@managed_blog) March 23, 2022
Don't believe me?
Wait until you see what I'm working on next...
Hello, and welcome back! If you follow me on Twitter, you may have seen the above tweet before. It feels like a bold claim – especially given the face that Provisioning Packages (which are saved as ppkg files) have been around for a while but don’t really get used in most environments.
If you are reading this article because of this post, I hope that I haven’t oversold myself. I truly believe that provisioning packages are often overlooked. They allow us to provision a PC without bare metal re-imaging and require minimal infrastructure. When Windows 10 was first released, ppkg files had a lot of fanfare but never really gained much traction in enterprise environments.
This post isn’t meant to be a treatise on replacing imaging workloads with provisioning packages. In fact, it’s not even directly about OS deployment. This post is about exploring the art of the possible. In other words, how can we solve a common problem using the tools that we already have in our environment?
I am going to focus on two specific features of Provisioning Packages. Provisioning packs can be run almost completely silently during the Windows out-of-box experience. They apply settings to a device that were added to the package when it was created. One of the most powerful tasks a provisioning pack can perform is to run scripts. By combining these two features – running automatically (or nearly automatically) and executing scripts – we can silently launch a PowerShell script that runs from within Windows before a user ever completes the Out-of-box experience.
So what?
So what? Why would I want to run a script during OOBE? How can this solve any problems I am having?
At first glance, this may sound like a solution that’s looking for a problem. However, if you have ever had to manually collect AutoPilot hashes from a new Windows device, you should understand how cumbersome the process can be. While user-driven AutoPilot can be performed without having a record of the device in our environment, having the hash pre-populated is essential in some scenarios. If we want to use a deployment profile or use Windows Autopilot pre-provisioning mode, a device’s hardware hash must be uploaded ahead of time. The hash can be uploaded to your tenant by an OEM, your hardware vendor, or by running a script. The script can be run from the full OS or during OOBE by pressing shift+F10 and launching a command prompt.
Running the PowerShell script from a command prompt isn’t overly difficult, but it is time consuming. It’s effective for testing, but not effective at scale. What if we could run that script silently? What if we could send a package to a user, have them copy it to a USB drive, and then plug it into a computer they bought at their local big-box store? What if our support teams could gather those hashes by simply plugging in external media?
If all those things were possible it could make a potentially unwieldy process much more practical.
Collecting and managing AutoPilot hashes can be a painful process. Today we are going to deal with the first part of that – collecting the hash. In future posts I will share my solution for managing hardware hashes, group tags, primary users, and deleting and re-adding hashes if needed.
We will use a PowerShell script to gather a device’s serial number and hardware hash. The script will then connect to Microsoft Graph to upload the hash to Microsoft Endpoint Manager. The script will authenticate to Graph using the Microsoft Authentication Library PowerShell module and an Azure app registration. We will include the script in a provisioning package and use that ppkg to upload a device’s hardware hash. Provisioning packages are highly portable and can be run from both the full Windows OS and from the out-of-box experience.
Creating the App Registration
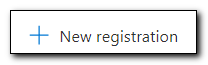
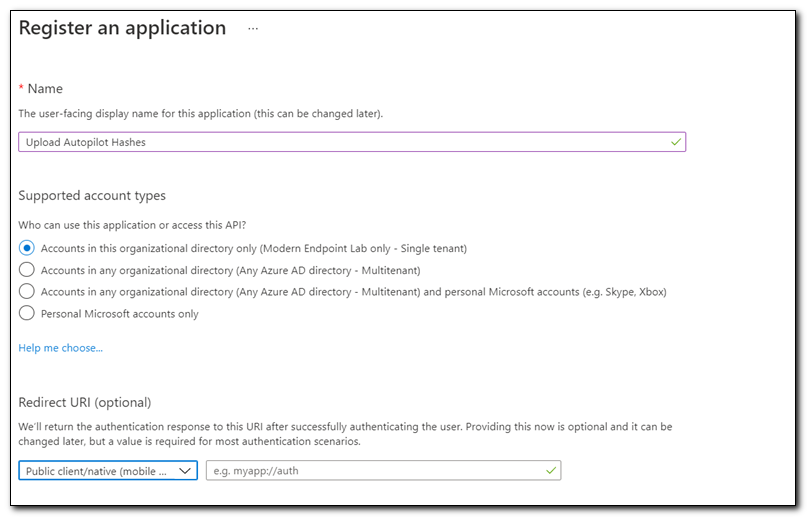
Before creating the script and adding it to the provisioning package we need to create an App Registration in Azure Active Directory. The app registration will be granted enough permission to upload hashes to Intune. Once we create the registration, we will create a client secret and then include that secret and the app registration’s Client ID in a PowerShell script. Open Azure Active Directory and go to App Registrations and click, “+ New registration.”
Assign your app registration a name and select, “Accounts in this organizational directory only.” Click Register to create the app registration.
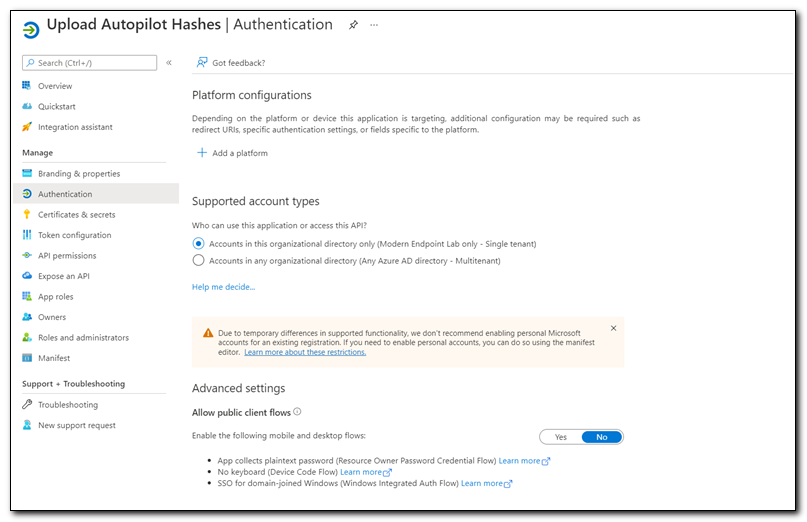
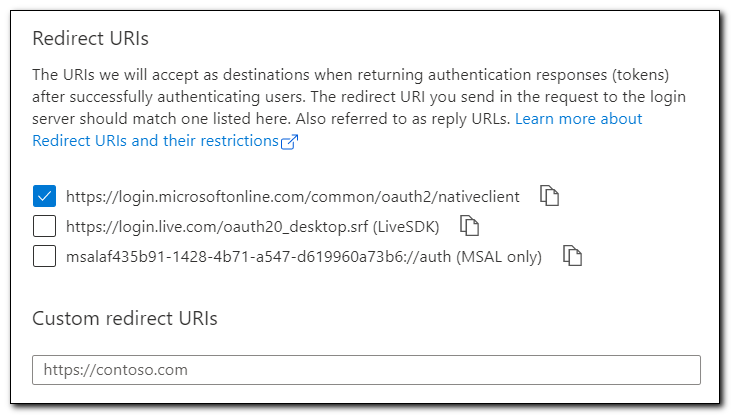
Click on “Authentication” under the Manage menu. Click “+ Add a Platform” to add a platform.
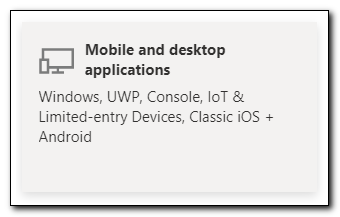
Click “Mobile and desktop applications.”
Check the box for https://login.microsoftonline.com/common/oauth2/nativeclient and click Configure.
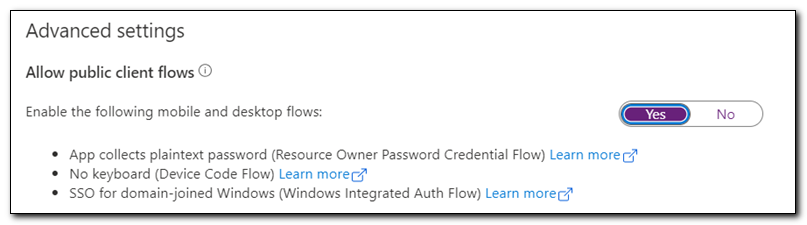
Set “Allow public client flows” to Yes. Click Save to save your changes.
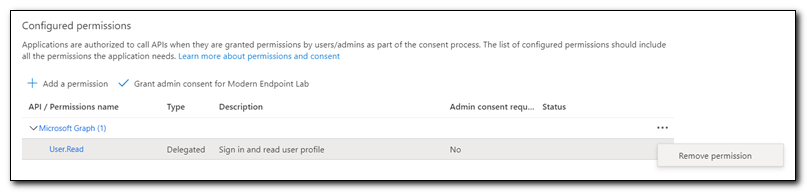
This app only needs to be able to upload hardware hashes, so in keeping with the principle of least privilege we will assign API permissions that limit what our app registration is able to do. Click on API permissions from the menu.
We don’t need this app to be able to read user objects, so we will remove the default User.Read permission. Click on the ellipses to the right of User.Read and select “Remove Permission.” Click “Yes Remove” to remove the permission.
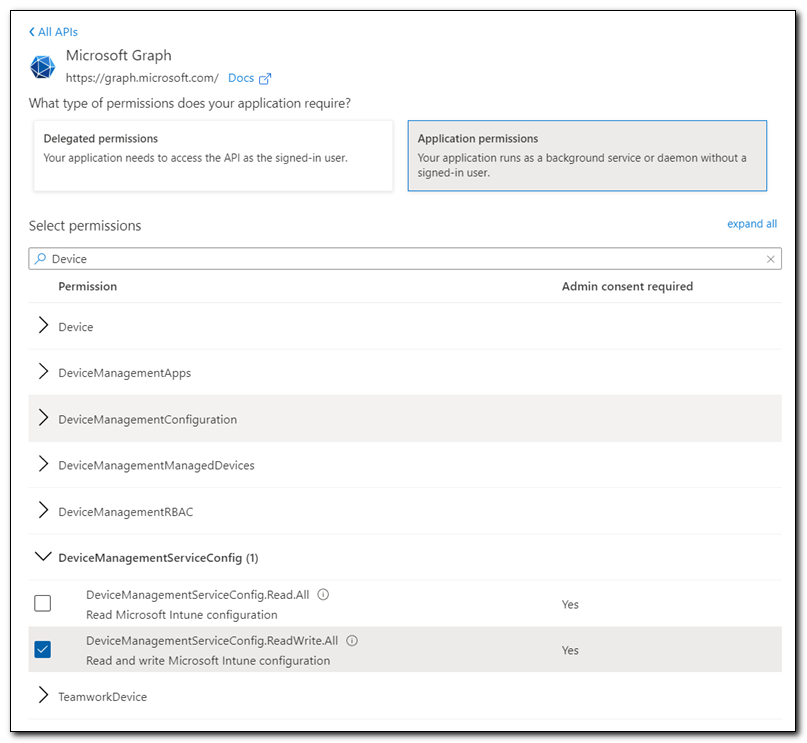
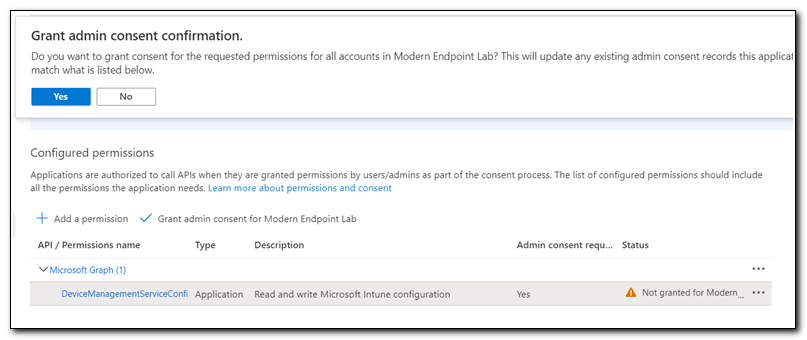
Click “+ Add a permission.” Select Microsoft Graph from the list of commonly used Microsoft APIs. Select Application permissions. Search for “device.” Select DeviceManagementServiceConfig.ReadWrite.All. Click Add permissions.
After adding the permission click on “Grant admin consent for…” Click Yes to confirm.
Next, we will create a client secret to use with our script in the provisioning package. Click on Certificates & Secrets from the menu. Click on ”+ New client secret.”
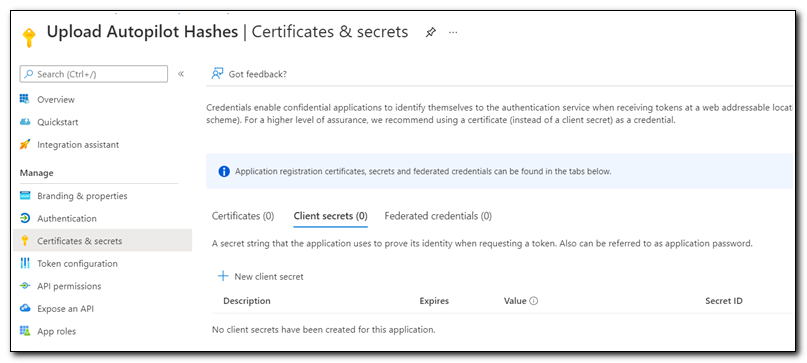
Name your client secret and set the expiration period and click add. Copy the client secret for later use (please note, secrets should be protected just like passwords – I am showing this one as an example, and it will be deleted prior to publishing).

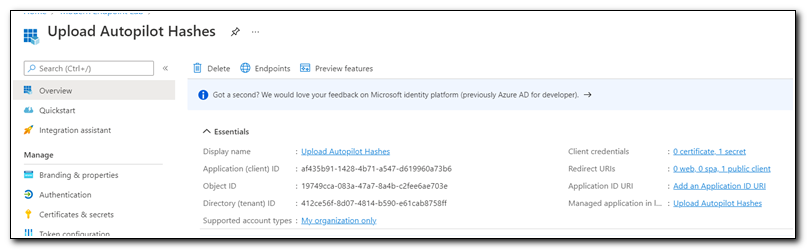
Click on Overview. Copy the Application (client) ID. We will use this value in our script as well.
The Script
The heart of our solution is a script that gathers the serial number and hardware hash and then makes a Microsoft Graph call to upload the hash to Intune. The script is based on my Invoke-MsGraphCall function. It leverages the Microsoft Authentication Library PowerShell module.
The script first checks for and downloads the MSAL.ps PowerShell module. It isn’t natively part of the OS, so we know that it won’t be present on a computer during OOBE. The script checks for the presence of the module. When it is not found it will install NuGet and then install the authentication module.
#Install MSAL.ps module if not currently installed
If(!(Get-Module MSAL.ps)){

    Write-Host "Installing Nuget"
    Install-PackageProvider -Name NuGet -Force

    Write-Host "Installing module"
    Install-Module MSAL.ps -Force

    Write-Host "Importing module"
    Import-Module MSAL.ps -Force

}
Next, we need to get an authorization token from Azure Active Directory. This is where you will replace my Client ID, Tenant ID, and Client Secret with your own. The Client ID and Client Secret were created earlier in this article.
#Use a client secret to authenticate to Microsoft Graph using MSAL
$authparams = @{
    ClientId    = 'af435b91-1428-4b71-a547-d619960a73b6'
    TenantId    = 'modernendpoint.xyz'
    ClientSecret = ('eBW7Q~_9gzYI6UqIuVFD7be.whnrPNxDmtLKb' | ConvertTo-SecureString -AsPlainText -Force )
}

$auth = Get-MsalToken @authParams

#Set Access token variable for use when making API calls
$AccessToken = $Auth.AccessToken
The next part of the script creates the Invoke-MsGraphCall function. I explain that more in depth in this post.
#Function to make Microsoft Graph API calls
Function Invoke-MsGraphCall {

    [cmdletBinding()]
    param(
        [Parameter(Mandatory=$True)]
        [string]$AccessToken,
        [Parameter(Mandatory=$True)]
        [string]$URI,
        [Parameter(Mandatory=$True)]
        [string]$Method,
        [Parameter(Mandatory=$False)]
        [string]$Body
    )

    #Create Splat hashtable
    $graphSplatParams = @{
        Headers     = @{
            "Content-Type"  = "application/json"
            "Authorization" = "Bearer $($AccessToken)"
        }
        Method = $Method
        URI = $URI
        ErrorAction = "SilentlyContinue"
        #StatusCodeVariable = "scv"
    }

    #If method requires body, add body to splat
    If($Method -in ('PUT','PATCH','POST')){

        $graphSplatParams["Body"] = $Body

    }

    #Return API call result to script
    $MSGraphResult = Invoke-RestMethod @graphSplatParams

    #Return status code variable to script
    Return $SCV, $MSGraphResult

}
Through this point the script has only prepared the environment for gathering and uploading our hardware hash. Next, we will gather the hardware hash and serial number from the machine. To find this information, I reviewed Michael Niehaus’ Get-WindowsAutopilotInfo script. It gathers both the hardware hash and serial number from WMI. The hash is being returned to the $hash variable and the serial number is returned to the $serial variable.
#Gather Autopilot details
$session = New-CimSession
$serial = (Get-CimInstance -CimSession $session -Class Win32_BIOS).SerialNumber
$devDetail = (Get-CimInstance -CimSession $session -Namespace root/cimv2/mdm/dmmap -Class MDM_DevDetail_Ext01 -Filter "InstanceID='Ext' AND ParentID='./DevDetail'")
$hash = $devDetail.DeviceHardwareData
Now that we have both the serial number and hash, we can upload them to Microsoft Endpoint Manager Admin Center. It’s worth noting that we could also assign a Group Tag, Assigned User, and additional device details by including those properties in the body hash.
We upload the hash by making a POST request to https://graph.microsoft.com/beta/deviceManagement/importedWindowsAutopilotDeviceIdentities. The body must include both the serialNumber and hardwareIdentifier properties.
The script then uses a Try-Catch block to call Invoke-MsGraphCall. If the call fails for any reason, the script will return the error that occurred and exit with an exit code of 1. If it succeeds, the script will exit with an exit code of 0.
#Create required variables
#The following example will update the management name of the device at the following URI
$URI = "https://graph.microsoft.com/beta/deviceManagement/importedWindowsAutopilotDeviceIdentities"
$Body = @{ "serialNumber" = "$serial"; "hardwareIdentifier" = "$hash" } | ConvertTo-Json
$Method = "POST"

Try{

    #Call Invoke-MsGraphCall
    $MSGraphCall = Invoke-MsGraphCall -AccessToken $AccessToken -URI $URI -Method $Method -Body $Body

    } Catch {

        Write-Output "An error occurred:"
        Write-Output $_
        Exit 1

    }

If($MSGraphCall){

    Write-Output $MSGraphCall
    Exit 0

}
You can download the complete script from my GitHub. Update the script with your ClientID, TenantID, and ClientSecret and save it locally.
Creating the Provisioning Package
Once we have the script created we are ready to create our Provisioning Package. If you don’t already have Windows Configuration Designer installed, you will need to install it now. The Windows Configuration Designer can be installed from two separate places. The Windows Imaging and Configuration Designer is available as part of the Microsoft Deployment Toolkit. The Windows Configuration Designer app is also available in the Microsoft Store. Install the app from the Microsoft store.

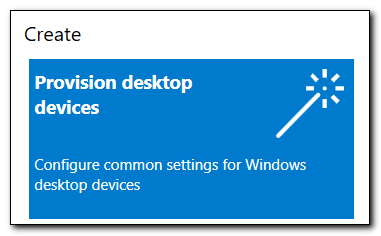
Open Windows Configuration Designer. Click on “Provision desktop devices.”
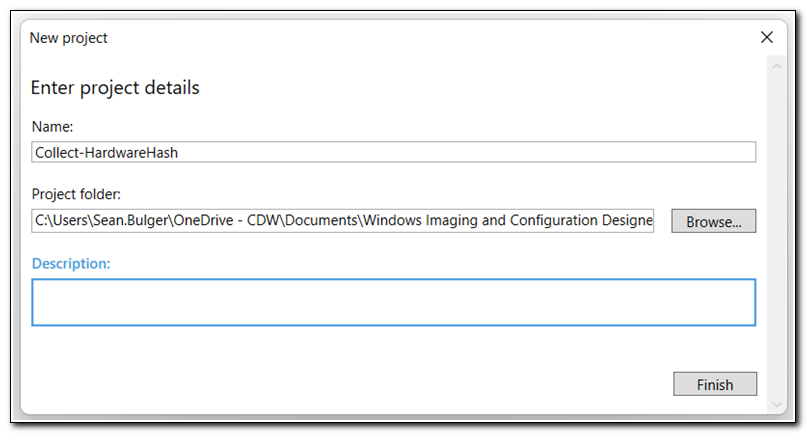
Name your project and click Finish.
Do not configure any settings. Click on “Switch to advanced editor” in the lower left corner. When prompted, click “Yes” to open the advanced editor.

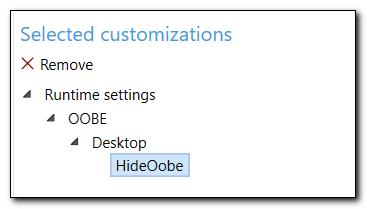
On the right side of the screen, we see a list of configured customizations. Before making any other changes drill down into “Runtime settings” to find the “HideOobe” configuration and click “X Remove,” to remove the pre-configured Runtime Settings.
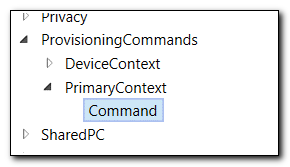
In the left hand column, we have a list of available commands. Select Provisioning Commands > Primary Context > Command.
In the center pane, assign a name to the command and click “Add” at the bottom of the screen.
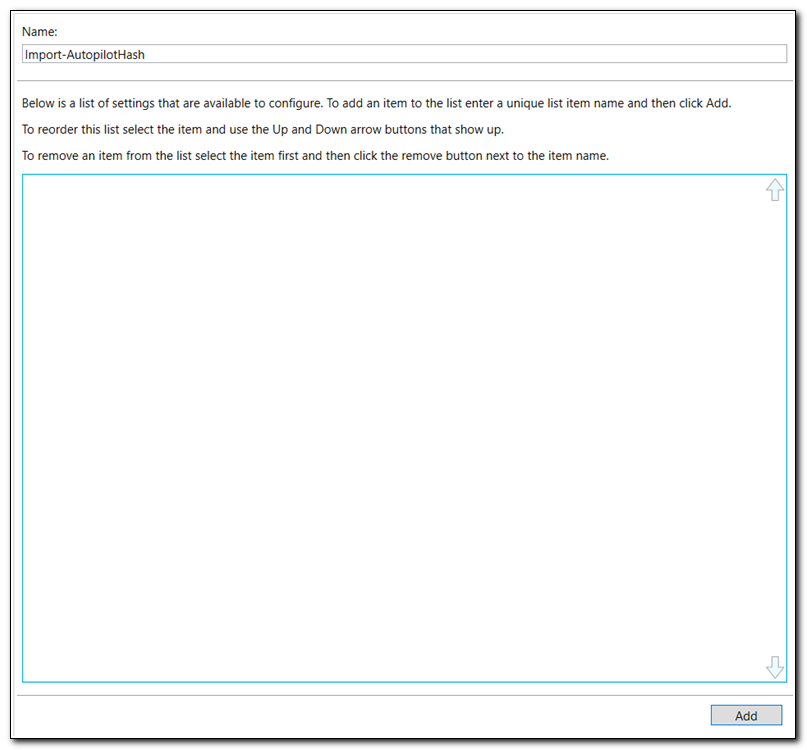
Additional options will appear in Available customizations. Here we can select the different options we need to configure. First click on “Command File.” This is where we will specify the script file we want to add to the provisioning pack.
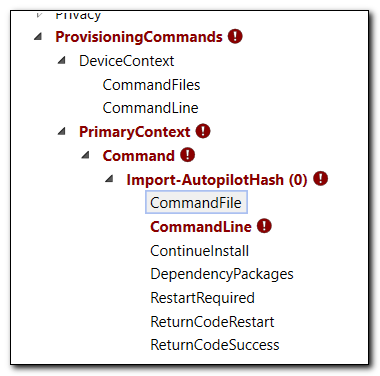
In the center panel browse to find the script file we recently created.

Click on CommandLine from the list of available customizations. Enter the following command:
PowerShell.exe -ExecutionPolicy Bypass -File Import-AutopilotHashFromPpkg.ps1

Click on RestartRequired in the list of available customizations. Set the value of RestartRequired to FALSE.

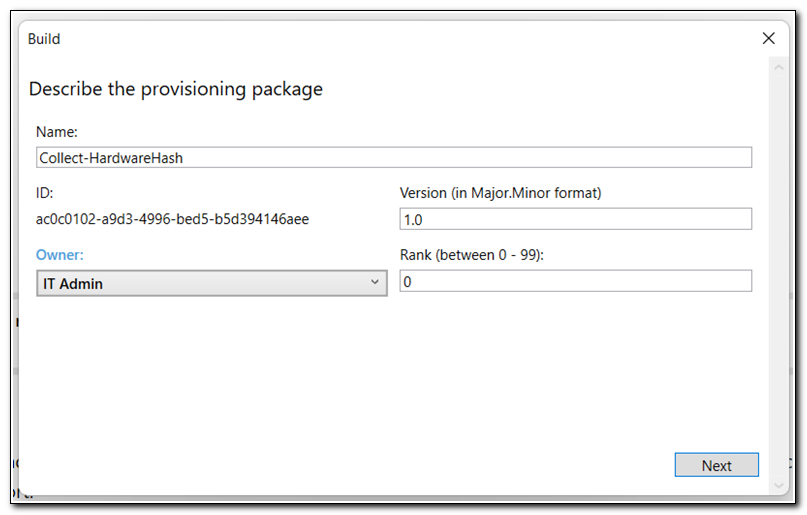
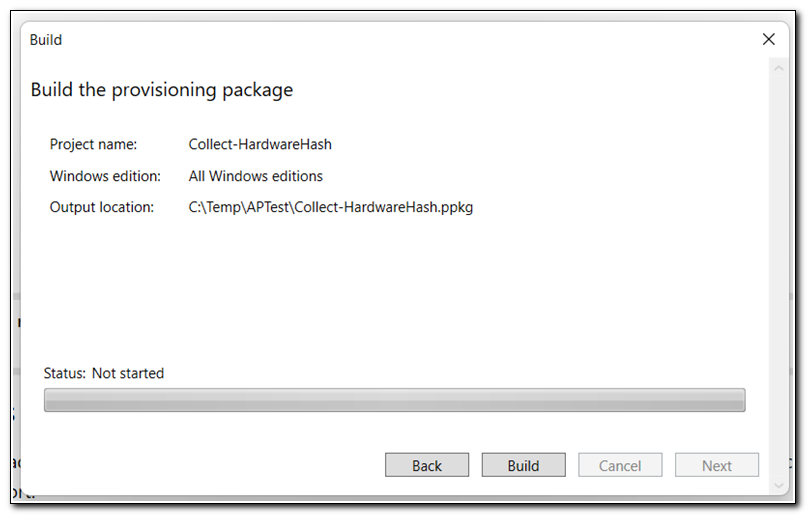
Those are all of the settings we need to configure to collect the hardware hash. Click on “Export” on the ribbon and select Provisioning Package. Set the owner value and click next.
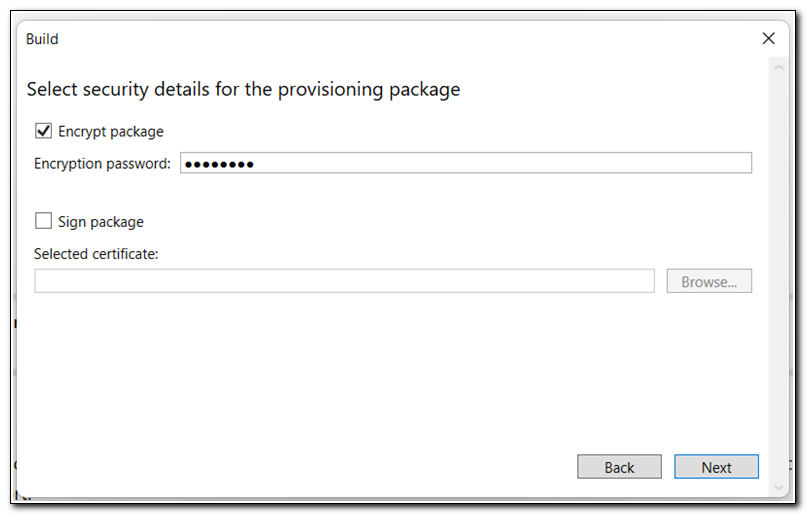
Optionally, you can encrypt the package and add a password. I recommend this because of the client secret embedded in the script. When you encrypt a provisioning package you will need to enter a password to run it during OOBE. If you want it to run without user interaction you can opt to not encrypt the package. In that instance you may want to consider using certificate authentication instead of a secret. Click next.
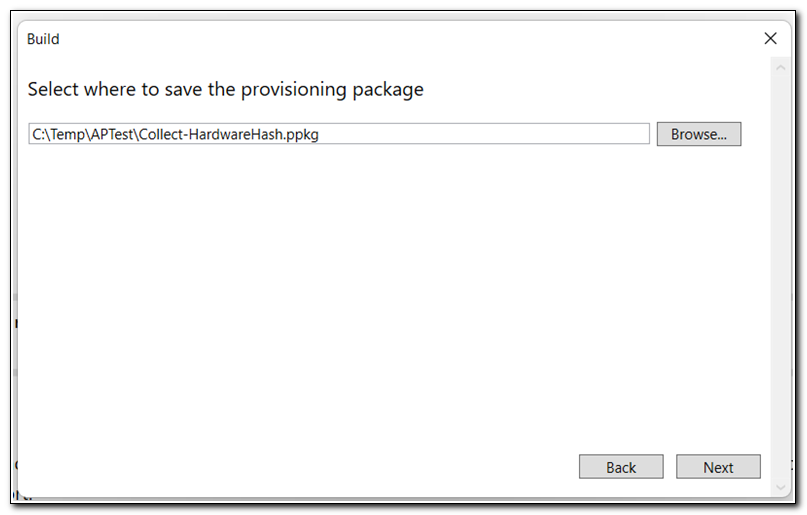
Choose a place to save the provisioning pack and click next.
Click build to build your package. Confirm all of your settings and click “Finish.”
Testing your Provisioning Package
We are ready to test our provisioning package. If you have a physical PC to test it on you can simply copy the script to a USB drive. Some virtual machines support removable media, but if you are using a Hyper-V virtual machine you will need to create an ISO that you can use within your virtual environment. I found a great PowerShell script that converts PPKG files to an ISO. This is based on a script originally created by Chris Wu, but was updated by Alistair M. Unfortunately, I can’t find them on Twitter, so the best I can do is link back to Alistair’s web page.
I will be demonstrating this on a Hyper-V virtual machine. There may be some minor differences if you are running this on a physical computer. I will call out those details throughout the process. It is also worth noting that this script requires an internet connection, so make sure your device is connected before starting the process.
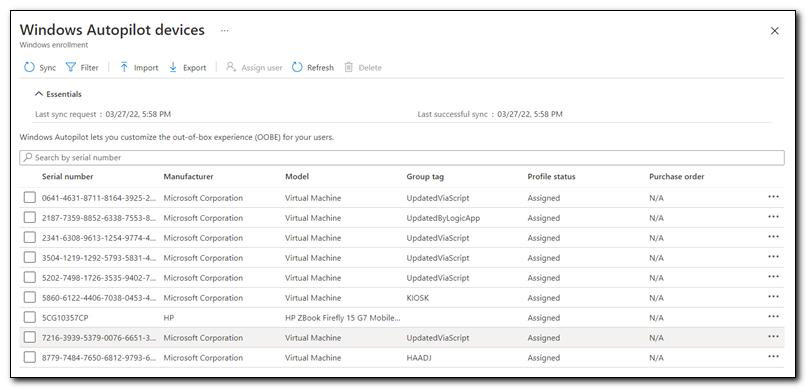
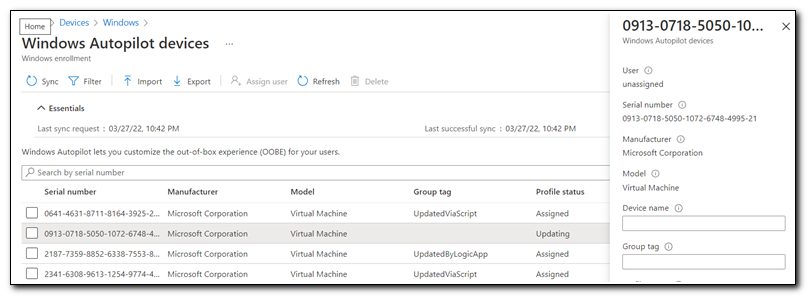
First, confirm that your virtual machine doesn’t show up on the Windows Autopilot devices screen. Most devices will have a short 7-10 character serial number. Virtual machines will have a much longer serial number. In this case, I know that my VM’s serial number starts with 0913. It is not presently on my Autopilot devices list.
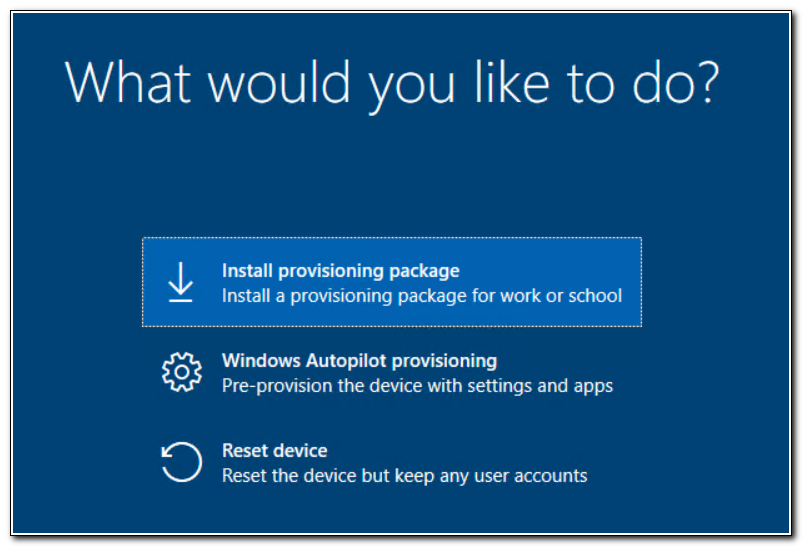
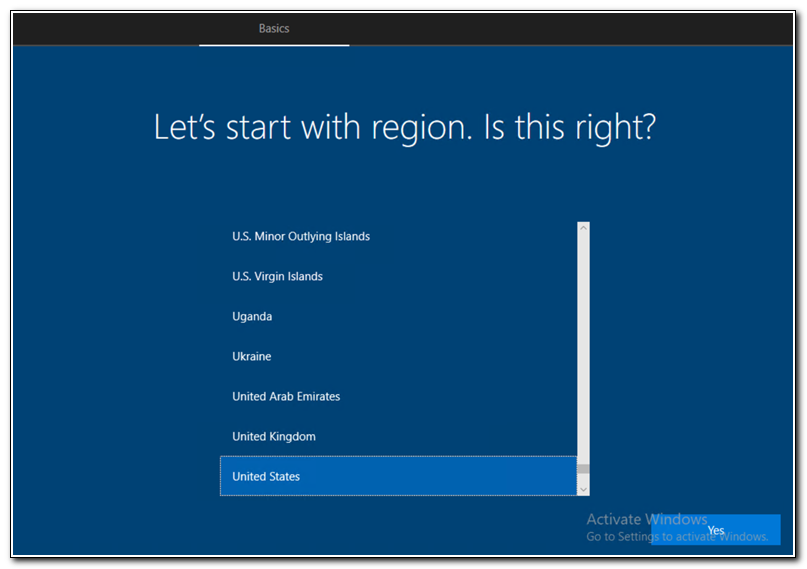
Boot your computer to the out-of-box experience. If you are using a physical device plug in your removable media. If you are on a virtual machine, make sure that your ISO file is mounted. In most cases, a physical PC will detect that removable media was just connected and run the ppkg. If you are on a virtual machine (or if your physical device doesn’t run it automatically) press the Windows key 5 times to open the pre-provisioning screen.
On the provisioning screen click “Install Provisioning package” and click Continue.
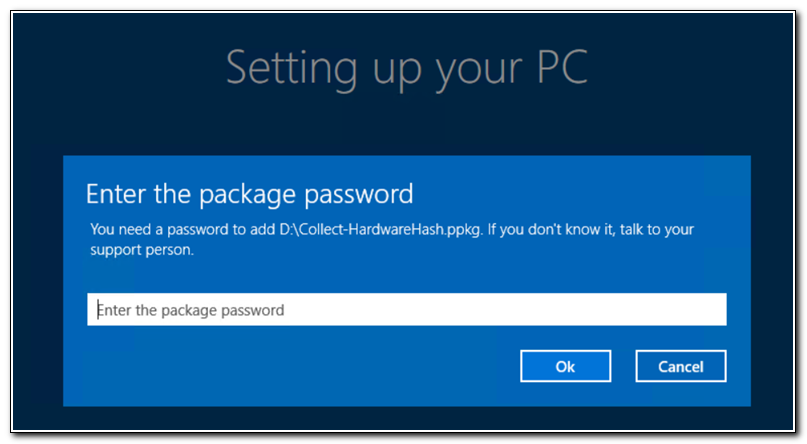
When prompted enter the password (if you encrypted your ppkg) and click Ok.
The provisioning package will run. It should sit on the “Install Scripts” step for several minutes. Remember, it needs to install the MSAL.ps module.
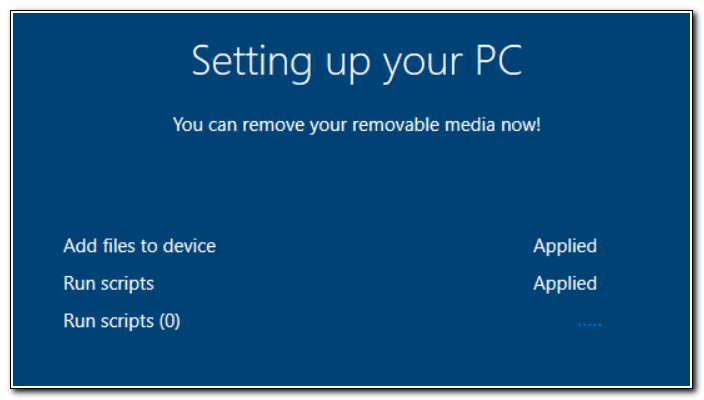
After several minutes, the script should finish and return to the keyboard selection screen.
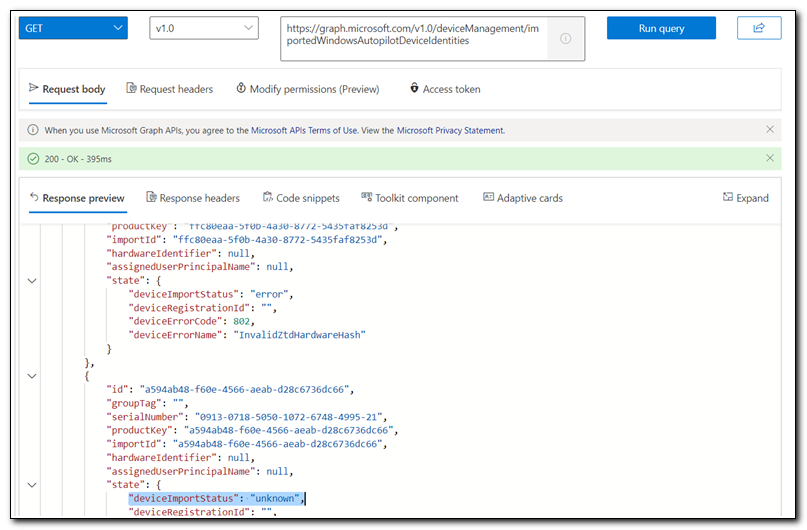
It may take several minutes for the upload to complete. If you are unsure, you can check if it is importing by opening Microsoft Graph Explorer and making a GET request to https://graph.microsoft.com/v1.0/deviceManagement/importedWindowsAutopilotDeviceIdentities. Here I can see that my device appears on the list with a deviceImportStatus of unknown.
Once the import has completed, we can see that the device has been uploaded to our Windows Autopilot devices list.
The Takeaway
I had two goals for this post. First, I hope that this post provides a practical solution facing many Microsoft Endpoint Manager administrators. Uploading Autopilot hashes can be a painful process. This provides a working solution to simplify that process. Second, I hope that this post demonstrates the “artof the possible” when it comes to using provisioning packs. While this isn’t a typical use for them, it relies heavily on the mechanics and functionality they provide.
Provisioning packages are a powerful tool that can open a lot of possibilities when it comes to OS deployment. Anything that you can accomplish via a script can be completed using a provisioning package. This opens a lot of opportunities to help get devices in the correct state before deploying them with Autopilot, and maybe it will even make a few people reconsider using provisioning packs in their environment.
The possibilities are endless. How can you use provisioning packs in your environment?
Keep following for more great content, including how I manage Autopilot hashes and devices!