Managing Language Packs in an MEMCM Task Sequence with UI++ and Unattend.xml
The Challenge
I was recently asked to create a simple process to change the primary language of Windows 10 during OS Deployment. Due to regional expectations we also had to be able to select a different keyboard layout based on user preferences. One of the challenges we face is that we have support personnel in different regions, but not in all offices. Our remote offices did not have a centralized imaging solution, which meant that we needed to provide a solution and streamline the process.
My goal was to provide a solution that would be easy to understand, simple to execute, and easy to maintain across different regions. My personal preference is a simple task sequence that minimizes the number of conditional steps needed to execute.
In this case I wanted to provide our technicians with a clean user interface. I wanted to avoid using DISM to inject languages during the task sequence, which in turn prevents me from having to manage additional content used in the task sequence. The task sequence should be lite-touch, prompting for basic information like site code, form factor, language settings, and additional applications.
Microsoft Endpoint Manager 1910 added support for language settings to the “Apply Windows Settings” step. This would be a great solution if you have a small number of configurations to support, but in an environment with a multitude of possibilities it could be difficult to manage. I will cover using these settings in a future blog post as I think they are an excellent addition to Configuration Manager, they just don’t meet my needs for this project.
Most of the other documentation that I found required integration of MDT with SCCM. The posts that did not use integrated MDT used some elements of MDT or other scripts to set these values. I considered that option but wanted to see if I could get by without the additional steps. When I saw that language support had been added to the task sequence I decided to test whether or not I could set the language settings without the use of a script. This may have worked prior to version 1910, but I have not tested it. I suspect that this functionality is a direct result of the settings being added to the task sequence directly.
After looking at different possible solutions I determined that the best way to create a technician-facing UI was UI++ by Jason Sandys of MEMFTW. UI++ gives me the ability to create a simple UI that can be easily customized and ported to other locations. I can use one deployment package for all my locations and point to a different XML file based on the region.
Prerequisites:
This post assumes that you have a WIM file that already has your language packs injected into it. There are multiple ways to do this. I will cover my process in a future post – but at a high level I do the following:
- Gather installation media for Windows 10, language packs, and features on demand
- Generate a WIM file that has language packs, features on demand, .Net, and consumer OneDrive client updates injected into it using WimWitch by Donna Ryan
- Save the WIM from step 2 as my baseline
- Run WimWitch monthly against the Wim from step 2 to apply updates
- Add the updated WIM file to MEMCM
Setting up UI++
(Note: my unattend.xml and UI++.xml files are included at the end of this article)
    <Action Type="Input" Name="LanguageSelection" Title="Primary Language" ShowBack="True" ShowCancel="True">
            <ChoiceInput Variable="MyLanguage" Question="Please select a primary locale for this computer" Required="True" >
                    <Choice Option="Bulgarian (Bulgaria)" Value="bg-BG" />
                    <Choice Option="Dutch (Netherlands)" Value="nl-NL"/>
                    <Choice Option="English (UK)" Value="en-GB"/>
                    <Choice Option="English (US)" Value="en-US"/>
                    <Choice Option="French (France)" Value="fr-FR" />
                    <Choice Option="German (Germany)" Value="de-DE" />
                    <Choice Option="Spanish (Spain)" Value="es-ES" />
            </ChoiceInput>
    </Action>
UI++ uses a set of customizable interactive actions to collect input from the end user. This section of XML can be broken down as follows:

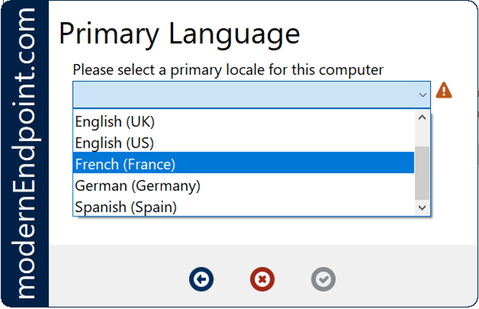
This generates the following input. In this example the tech selected “French” as the primary language. This sets the variable %MyLanguage% to fr-FR. This variable will be used to set multiple values in the answer file.
    <Action Type="Input" Name="KeyboardSelection" Title="Keyboard Layout">
            <ChoiceInput Variable="ChangeKeyboard" Question="Would you like to select a different keyboard layout?" Required="True" >
                    <Choice Option="Yes - make it the default" Value="YesDefault"/>
                    <Choice Option="Yes - make it secondary" Value="YesSecondary"/>
                    <Choice Option="Yes - replace the standard" Value="YesReplace"/>
                    <Choice Option="No" Value="No"/>
            </ChoiceInput>
    </Action>
This action is similar to the Primary Language step above. The technician is asked if they need to change the default keyboard layout. If they say no they default keyboard layout for the primary language is used. If they need to add an additional keyboard layout, they have the option to set it as the default keyboard, set it as secondary, or replace the default keyboard entirely. Note that the possible values are No, YesDefault, YesSecondary, and YesReplace. The ChangeKeyboard variable will be set to one of these values.
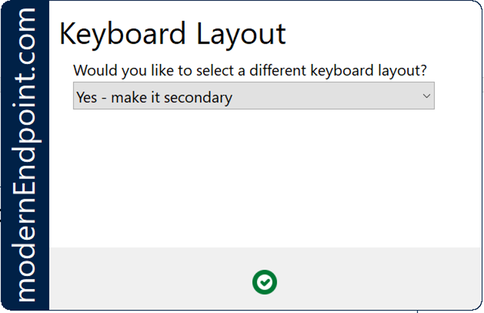
In this case the tech selected yes – make it secondary. This will be used later in UI++ to help build the OSDInputLocale variable that will be used in the answer file.
    <Action Type="Input" Name="KeyboardSelection" Title="Keyboard Layout" Condition='"%ChangeKeyboard%" <> "No"' ShowBack="True" ShowCancel="True">
            <ChoiceInput Variable="MyKeyboard" Question="Please select a Keyboard Layout for this computer" Required="True" >
                    <Choice Option="Bulgarian (Bulgaria)" Value="bg-BG" />
                    <Choice Option="Dutch (Netherlands)" Value="nl-NL"/>
                    <Choice Option="English (UK)" Value="en-GB"/>
                    <Choice Option="English (US)" Value="en-US"/>
                    <Choice Option="French (France)" Value="fr-FR" />
                    <Choice Option="German (Germany)" Value="de-DE" />
                    <Choice Option="Spanish (Spain)" Value="es-ES" />
            </ChoiceInput>
    </Action>
The keyboard selection action has a condition tag. In this case if %ChangeKeyboard% is not equal to “No” the action will be displayed. The variable %MyKeyboard% will be set based on the language selected.
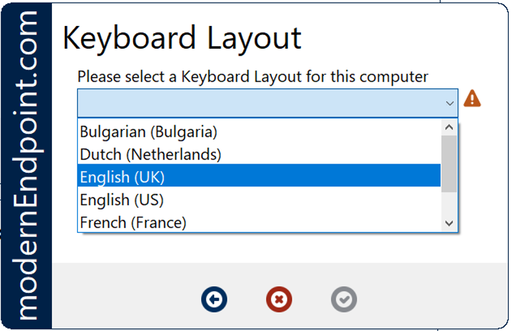
In this case, the technician selected English (UK), which sets %MyKeyboard% to “en-GB.”
    <Action Type="Input" Name="Time Zone" Title="Please Select a Time Zone" ShowBack="True" ShowCancel="True">
            <ChoiceInput Variable="MyTimeZone" Question="Please select a Time Zone for this computer" Required="True" >
                    <Choice Option="1. GMT Standard Time (GMT)" Value="GMT Standard Time"/>
                    <Choice Option="2. Greenwich Standard Time (GMT)" Value="Greenwich Standard Time"/>
                    <Choice Option="3. Central Europe Standard Time (GMT+01:00)" Value="Central Europe Standard Time"/>
                    <Choice Option="4. Central European Standard Time (GMT+01:00)" Value="Central European Standard Time"/>
                    <Choice Option="5. Romance Standard Time (GMT+01:00)" Value="Romance Standard Time"/>
                    <Choice Option="5. W. Europe Standard Time (GMT+01:00)" Value="W. Europe Standard Time"/>
                    <Choice Option="6. GTB Standard Time (GMT+02:00)" Value="GTB Standard Time"/>
                    <Choice Option="7. South Africa Standard Time (GMT+02:00)" Value="South Africa Standard Time"/>
            </ChoiceInput>
    </Action>
I would have skipped the TimeZone screen for this post, but I wanted to point out that for the Time Zone to work correctly the value must exactly match Microsoft’s listed time zones. This is one of the rare examples where there’s not a simplified value that can be used. I recommend copying the value from Microsoft’s time zone index.

    <Action Type="TSVar" Name="OSDInputLocale" Condition='"%ChangeKeyboard%" = "No"'>"%MyLanguage%"</Action>
    <Action Type="TSVar" Name="OSDInputLocale" Condition='"%ChangeKeyboard%" = "YesDefault"'>"%MyKeyboard%;%MyLanguage%"</Action>
    <Action Type="TSVar" Name="OSDInputLocale" Condition='"%ChangeKeyboard%" = "YesSecondary"'>"%MyLanguage%;%MyKeyboard%"</Action>
    <Action Type="TSVar" Name="OSDInputLocale" Condition='"%ChangeKeyboard%" = "YesReplace"'>"%MyKeyboard%"</Action>
    <Action Type="TSVar" Name="OSDUserLocale" >"%MyLanguage%"</Action>
    <Action Type="TSVar" Name="OSDUILanguage" >"%MyLanguage%"</Action>
    <Action Type="TSVar" Name="OSDSystemLocale" >"%MyLanguage%"</Action>
    <Action Type="TSVar" Name="OSDUILanguageFallback" >"%MyLanguage%"</Action>
    <Action Type="TSVar" Name="OSDTimeZone" >"%MyTimeZone%"</Action>
The action type “TSVar” sets a task sequence variable. In this the task sequences variables are being set based on the values that were set in previous steps. The value of OSDInputLocale will be used to set the keyboard layouts. When setting multiple keyboard layouts, the values must be separated by a semi-colon. I have built my version of UI++ to support two keyboard layouts. The value is contructed based on the value of the %ChangeKeyboard% variable collected above. In this demonstration I set %MyLanguage% to fr-FR and %MyKeyboard% to en-GB. We set the alternate keyboard to be set as the secondary keyboard. This will result in OSDInputLocale being set to “%MyLanguage%;%MyKeyboard%”, which gives us the value “fr-FR;en-GB”.
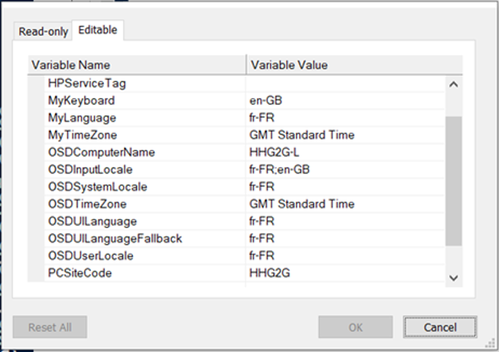
If you hit CTRL+F2 while UI++ is still open, you can see the variables that are available. There are two tabs – one for Read-Only variables, and one for Editable Variables. In this case we can see all of the values that were set through UI++, including the Task Sequence variables for regional settings that will be passed into the answer file.
Setting up a Custom Answer File
Answer files (usually unattend.xml) can be used to customize a Windows installation at setup. The file is an XML file that contains tags that are used to configure Windows. These tags are organized into settings passes that tell Windows setup when to use the various values. If you aren’t familiar with how an answer file is constructed and would like to learn more, I highly recommend reading more about it here.
The “Apply Operating System” step in a Microsoft Endpoint Manager task sequence includes the option to use a custom unattend.xml file. The file needs to be included in a deployment package and must be named unattend.xml or autounattend.xml. When you run a task sequence to deploy Windows the file is read, and the settings are applied at the corresponding points of Windows setup.
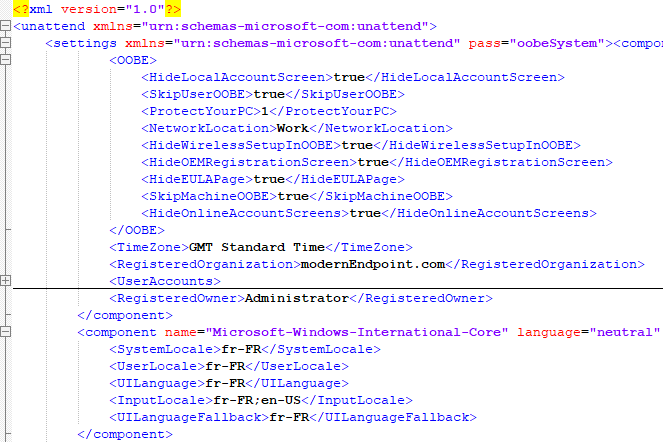
My unattend.xml is simple. I use it to skip the out-of-box experience and to set my language and localization settings. For this use case all my settings are arranged in the oobeSystem settings pass:
    <?xml version="1.0" encoding="utf-8"?>
    <unattend xmlns="urn:schemas-microsoft-com:unattend">
            <settings pass="oobeSystem">
                    <component name="Microsoft-Windows-Shell-Setup" processorArchitecture="amd64" publicKeyToken="31bf3856ad364e35" language="neutral" versionScope="nonSxS" xmlns:wcm="http://schemas.microsoft.com/WMIConfig/2002/State" xmlns:xsi="http://www.w3.org/2001/XMLSchema-instance">
                <OOBE>
                    <HideEULAPage>true</HideEULAPage>
                    <HideLocalAccountScreen>true</HideLocalAccountScreen>
                    <HideOEMRegistrationScreen>true</HideOEMRegistrationScreen>
                    <HideOnlineAccountScreens>true</HideOnlineAccountScreens>
                    <HideWirelessSetupInOOBE>true</HideWirelessSetupInOOBE>
                    <SkipMachineOOBE>true</SkipMachineOOBE>
                    <SkipUserOOBE>true</SkipUserOOBE>
                </OOBE>
                <TimeZone>%OSDTimeZone%</TimeZone>
                    </component>
                    <component name="Microsoft-Windows-International-Core" language="neutral" processorArchitecture="amd64" publicKeyToken="31bf3856ad364e35" versionScope="nonSxS" xmlns:wcm="http://schemas.microsoft.com/WMIConfig/2002/State" xmlns:xsi="http://www.w3.org/2001/XMLSchema-instance">
                            <SystemLocale>%OSDSystemLocale%</SystemLocale>
                            <InputLocale>%OSDInputLocale%</InputLocale>
                            <UILanguage>%OSDUILanguage%</UILanguage>
                            <UILanguageFallback>%OSDUILanguageFallback%</UILanguageFallback>
                            <UserLocale>%OSDUserLocale%</UserLocale>
                    </component>
            </settings>
    </unattend>
There are two different component sections in my answer file. The first one is “Microsoft-Windows-Shell-Setup.” This component includes settings that control screens the end user sees during the Out of Box Experience. The time zone is included in the settings pass with the

Adding UI++ to the Task Sequence
There are different ways to launch UI++. For my use case the best method was to add it to the task sequence. UI++ needs to be included in a deployment package along with the XML file that will be used. I add it to my task sequence after disk partitioning and pre-provisioning BitLocker step.
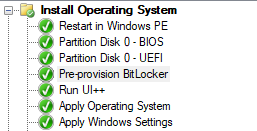
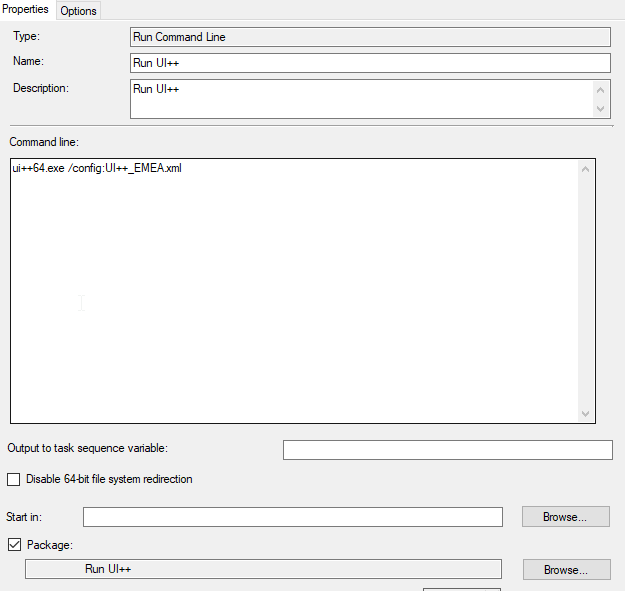
To call UI++ add a “Run Command Line” step to your task sequence. The command line used should be UI++64.exe /config:FileName.xml. Make sure that the “Apply Operating System” step includes a link to your answer file.
Testing
When you run the task sequence there are three specific items that you can check to see that the process is working as expected. First – you can hit CTRL+F2 while the UI++ screens are open during the task sequence. The Editable tab will show your variables and the values that have been stored. Once the “Apply Operating System” step has completed you can open a command prompt, browse to c:\windows\panther\unattend. Copy the unattend.xml file to a thumb drive and move it to a computer where you can view the XML. You should see the values you set in the oobeSystem settings pass.
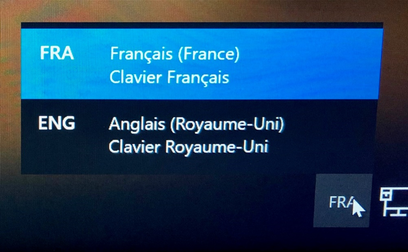
Finally, on the Windows login screen you will see an icon with a three-letter code at the bottom right corner. If you click on that icon you can select an alternate keyboard layout. In this test case I had sent French as the primary language and English (UK) as secondary.