Managing localization settings in a Microsoft Endpoint Manager CM Task Sequence with native functionality
This blog post is the completion of a series on managing language and input settings in a Microsoft Endpoint Manager task sequence. Previous posts covered using UI++ to set language values and using WimWitch to inject language packs in a Windows 10 WIM.
MEMCM Native Task Sequence Language Behavior
In previous posts I discussed my process for setting native language and keyboard settings using UI++ (from @JasonSandys) and injecting language packs into a Windows 10 WIM using WimWitch (from @TheNotoriousDRR). I decided on those tools based on my needs, but those posts overlooked important behavior that was introduced in Microsoft Endpoint Manager 1910.
Prior to 1910 there was not a native setting in the task sequence for setting UI language and input settings. 1910 introduced new settings on the Apply Windows Settings task sequence step that allow you to select from a list of native language packs and input settings. These still require either a WIM with language packs injected or installing the language packs dynamically during the task sequence, but they do make managing simple language settings simple. They are not perfect and don’t cover every possible option, but the native MEMCM functionality can be ideal in some scenarios.
This post will cover 3 native scenarios:
-
Setting the language and UI settings for a single language scenario using Apply Windows Settings
-
Dynamically setting language and UI settings with optional conditions and a Collection Variable
-
Using Collection Variables and a custom unattend.xml to set language options
Each one of these scenarios has advantages and disadvantages.
Option 1 gives us a clean, simple task sequence. We can easily set basic language and input settings for a single instance. For example, our users in Belgium use English as their system language, but then use the Dutch-Belgium keyboard layout. If we were creating a task sequence focused on that scenario this would be a perfect option. Unfortunately, this sets static values. You would have to use multiple conditional steps to use multiple language and keyboard layout options.
Option 2 builds off Option 1. We can use conditional steps to choose which set of Windows options to use. Depending on your scenario your conditions could be set dynamically, for example you could use the IP address to dynamically select which Apply Windows Settings step to use. Unfortunately, we don’t build computers in all locations – so a computer imaged in one location may be shipped to another. That doesn’t mean we can’t use conditional steps; it just means we must set a collection variable to set the location when the computer is being built. This is great! However, you are limited to the keyboards listed in the UI. In Brazil our users use the ABNT2 keyboard layout. This isn’t available in the UI, so we need another option to set the alternate keyboard for them.
Option 3 opens our options! We can use any of the available languages and keyboard settings available in Windows 10! As long as the language exists in our WIM we can prompt for a collection variable during a task sequence. The downside is that a technician needs to know which language options are available, and they need to enter them exactly when running a task sequence. This was one of the reasons that I chose to use UI++. Using a UI removes the chance for human error from a technician that may not know what options are available.
The Good Stuff
Option 1:
Option 1 is clean. It is simple, elegant, and is the building block for Option 2 and dynamic task sequences. This is the most basic option for setting language and input settings in a Microsoft Endpoint Manager task sequence.
-
Add a single Apply Windows Settings step to your task sequence
-
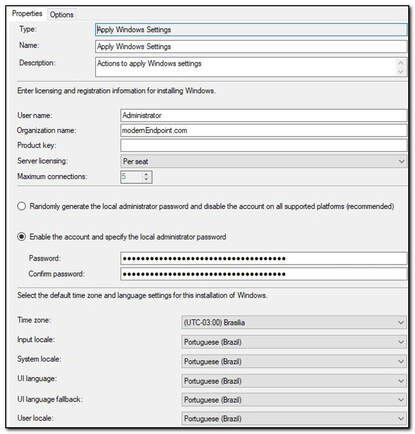
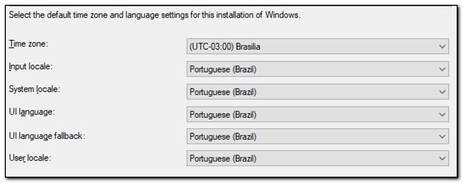
At the bottom of the page select your time zone, Input Locale, System Locale, UI Language, UI Language Fallback, and User Locale.
-
When you run a task sequence, the settings you set will be applied to all computers built with this task sequence.
Option 2:
Option 2 adds a dynamic layer to determine, based on conditions, what version of the Apply Windows Settings step to apply. We set up multiple Apply Windows Settings steps, and each one has a different condition that determines whether it will be applied. For the sake of this post I am using a blank Collection Variable to prompt a technician for the computer’s location. That value will be used to set the language settings.
-
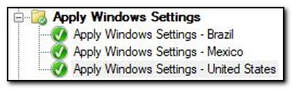
Create a group to house your Apply Windows Settings steps, and create a copy of Apply Windows Settings for each location.
-
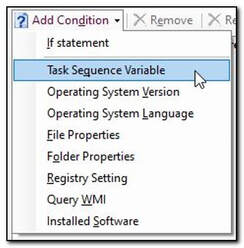
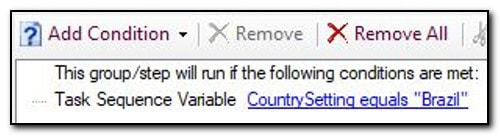
Open the first Apply Windows Settings step. Click on the Options tab and click “Add Condition.” Select “Task Sequence Variable” from the list.
-
We are going to set a Collection Variable of “CountrySetting.” We are going to set the condition to use the variable “CountrySetting,” the operator is “Equals,” and the value is “Brazil.”

-
The condition is now set to use this version of the Apply Windows Setting Step if the CountrySetting is entered as Brazil.
-
On the Properties tab of the Apply Windows Settings step set the language options to your requirements.
-
Repeat steps 2-5 for the other Apply Windows Settings steps in your task sequence.
-
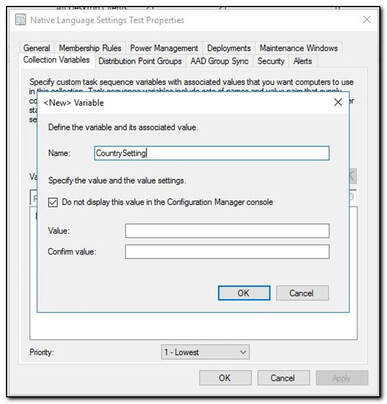
On the Assets and Compliance tab find your target Device Collection. Right click and select properties. Click on the Collection Variables tab and click on the yellow star to add a new Collection Variable.
-
Create a Collection Variable named CountrySetting. Leave the Value fields blank. Click OK to save the variable.
-
Deploy the task sequence as available to the target collection. When the task sequence runs you will be prompted for a CountrySetting. Enter the value for the Apply Windows Setting Step you want to run.
-
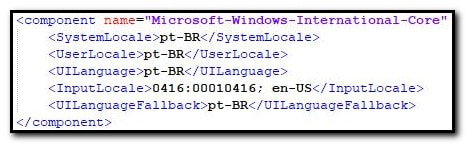
When the task sequence runs, we can get the Unattend.xml from a CMD line. We can see the values are being set. In this instance we used en-US for all, so we only see the systemLocale being set.
Option 3:
The third option provides a bridge for cases where Option 2 is not robust enough – for example, in cases in which an alternate keyboard layout needs to be set that isn’t available in the UI. I would recommend using another tool like UI++, but in many companies using a third-party tool creates additional hurdles that may make it less practical. This option gives those companies a native solution, even though it may be less user friendly than some of the third-party options.
- This step relies on a custom unattend.xml file. We will use the same unattend.xml file we used in the UI++ task sequence.
    <?xml version="1.0" encoding="utf-8"?>
    <unattend xmlns="urn:schemas-microsoft-com:unattend">
            <settings pass="oobeSystem">
                    <component name="Microsoft-Windows-Shell-Setup" processorArchitecture="amd64" publicKeyToken="31bf3856ad364e35" language="neutral" versionScope="nonSxS" xmlns:wcm="http://schemas.microsoft.com/WMIConfig/2002/State" xmlns:xsi="http://www.w3.org/2001/XMLSchema-instance">
                <OOBE>
                    <HideEULAPage>true</HideEULAPage>
                    <HideLocalAccountScreen>true</HideLocalAccountScreen>
                    <HideOEMRegistrationScreen>true</HideOEMRegistrationScreen>
                    <HideOnlineAccountScreens>true</HideOnlineAccountScreens>
                    <HideWirelessSetupInOOBE>true</HideWirelessSetupInOOBE>
                    <SkipMachineOOBE>true</SkipMachineOOBE>
                    <SkipUserOOBE>true</SkipUserOOBE>
                </OOBE>
                <TimeZone>%OSDTimeZone%</TimeZone>
                    </component>
                    <component name="Microsoft-Windows-International-Core" language="neutral" processorArchitecture="amd64" publicKeyToken="31bf3856ad364e35" versionScope="nonSxS" xmlns:wcm="http://schemas.microsoft.com/WMIConfig/2002/State" xmlns:xsi="http://www.w3.org/2001/XMLSchema-instance">
                            <SystemLocale>%OSDSystemLocale%</SystemLocale>
                            <InputLocale>%OSDInputLocale%</InputLocale>
                            <UILanguage>%OSDUILanguage%</UILanguage>
                            <UILanguageFallback>%OSDUILanguageFallback%</UILanguageFallback>
                            <UserLocale>%OSDUserLocale%</UserLocale>
                    </component>
            </settings>
    </unattend>
-
Option 3 also uses Collection Variables, but in this case, we are going to be using the native language and UI variables. One of the challenges with using the native functionality is that the values entered MUST match exactly. This is especially challenging with Time Zone settings. For that reason, I do not recommend setting the Time Zone using this method.
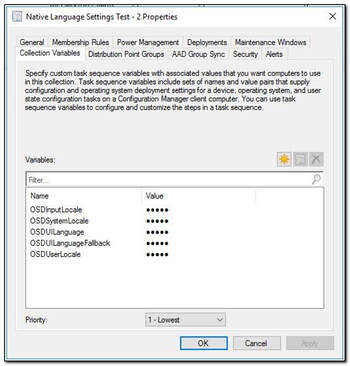
Open the properties for the target collection. Create the following Collection Variables. Do not set a value for those variables:
OSDInputLocale OSDSystemLocale OSDUILanguage OSDUILanguageFallback OSDUserLocale
-
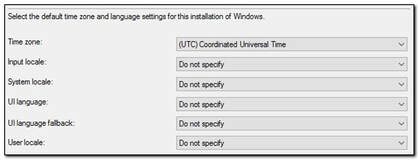
Open the Task Sequence and edit the Apply Windows Settings step. The language and UI settings should all be set to “Do Not Specify.”
-
Open the Apply Operating System step. Confirm that your Unattend.XML file is included in the task sequence.

-
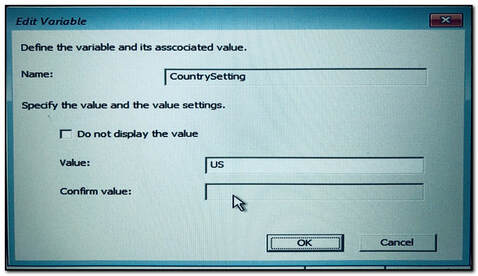
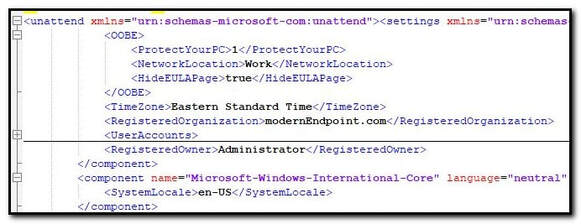
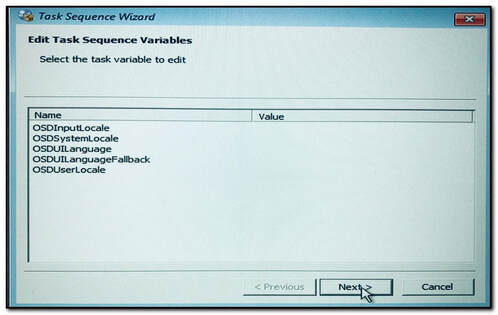
When you run the task sequence you will be prompted to enter values for the collection variables we previously set. The possible values for language and keyboard pairs can be found here. In this example, I needed to set the primary keyboard the ABNT2, which is the secondary keyboard layout for the Portuguese – Brazil language pack. The InputLocale variable supports multiple entries. Values should be separated by a semicolon. I need to be able to switch to a US based keyboard for testing, so I set the OSDInputLocale value to 0416:00010416;en-US. The remaining localization settings were set to pt-BR.
-
If we open the unattend.xml file this time we say that all of our localization settings are included in the oobeSystem settings pass.